DigitalOcean Droplet
What the heck is a DigitalOcean Droplet? In short, DigitalOcean is a cloud service provider and a Droplet is what they call their cloud hosted virtual machines. Think of it as having a little slice (or even a large slice) of a server where you can run things.
Why am I choosing DigitalOcean? Well, as it turns out, Remote Falcon is entirely hosted on a DigitalOcean, leveraging a kubernetes cluster and a DigitalOcean managed MongoDB. So it's a platform I'm familiar with. But they also offer virtual machines with static pricing that are super easy to set up and configure.
No, not at all! If you decide to use an Ubuntu Linux server from somewhere else, these instructions will still work the same. The only additional thing you'll have to do is install NGINX. More about that when we get there.
Prerequisites
Before getting into the nitty-gritty, there are some prerequisites we need to get out of the way, which is mainly signing up for a few accounts (if you don't have them already). Since creating accounts is a bit outside the scope of this documentation, I'm not going to go into detail on how to do it. But I will provide information on what you need.
Get A Domain
If you don't already have a domain you plan to use with Remote Falcon you'll need to get one. I personally use Squarespace Domains and it's what I'll be using in this guide, but you can use any domain provider. The steps will be the same but where you find things will differ.
DigitalOcean
Next you'll need to create a DigitalOcean account. In addition to creating an account, you'll need to set up Billing.
Yeah, cause nothing is free. Well, some things are free. But not the DigitalOcean Droplets. Don't worry though, the most you'll spend is $24/month. And if you decide it's not for you, you only have to pay for what you use.
Cloudflare
Lastly, a Cloudflare account will be needed. Is it required? Not really, but it does help simplify a lot of the security aspects of your domain, with things like DDoS protection and SSL certificate management, which, by the way, is free. So it's a good platform to use.
Create a DigitalOcean Droplet
Now it's time for the fun to begin! The first thing we need to do is create our DigitalOcean Droplet.
In the DigitalOcean platform, you'll find the Droplets option in the side menu. On the Droplets screen, click the Create Droplet button.
On the next screen there will be quite a few options, so let's walk through them:
Choose Region
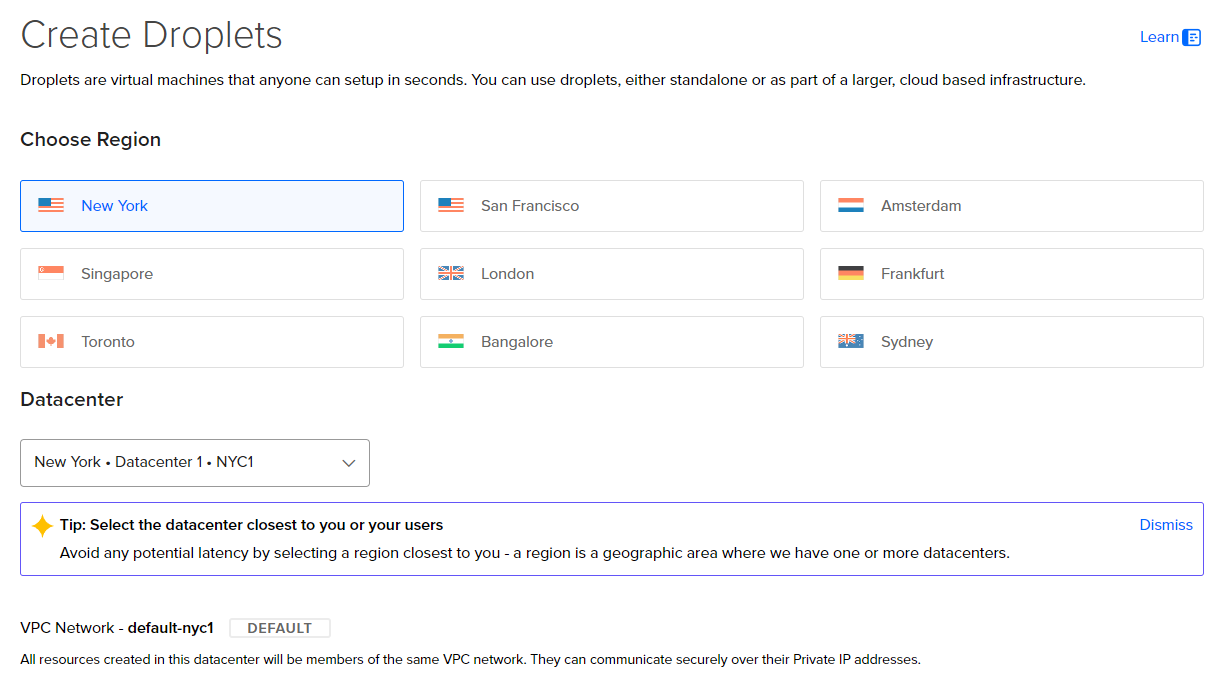
The first option you're presented with is what Region you want your Droplet to be in. The recommendation is to choose the region closest to you. I'll be choosing New York. For the datacenter just leave whatever it defaults to for the region.
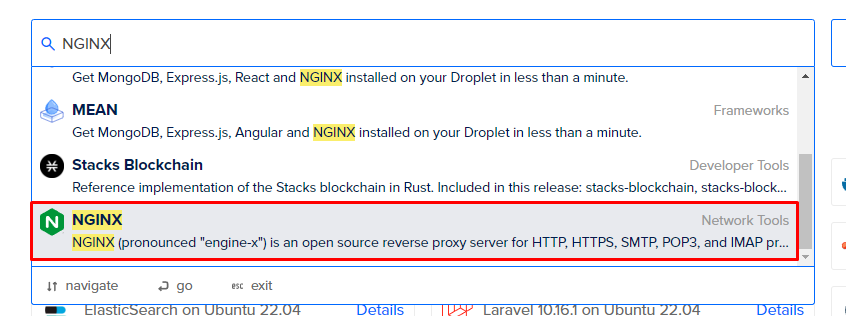
Choose Image
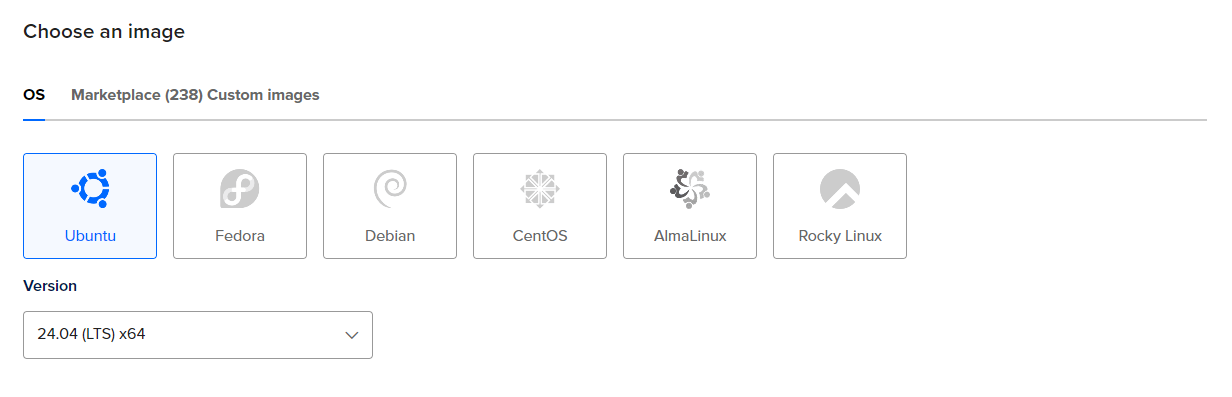
Next we'll be choosing what image we want to use to build our Droplet. There are several OS options, but we're actually going to pick an image that has NGINX configured for us (more on NGINX later). Click on Marketplace and search for NGINX. The one labeled NGINX is what we want.
Choose Size

The size (and cost) of your Droplet is based on how much CPU, Memory, and Disk Size the Droplet has. Obviously the more you get the more it costs. The amount of resources you need will be determined by the amount of traffic your site will get.
At a minimum you should have 2 CPU and 4GB memory (which is the $24 regular CPU option). Anything smaller than that and you'll be on the struggle bus in terms of performance. Or worse, the services won't even start up.
Choose Authentication
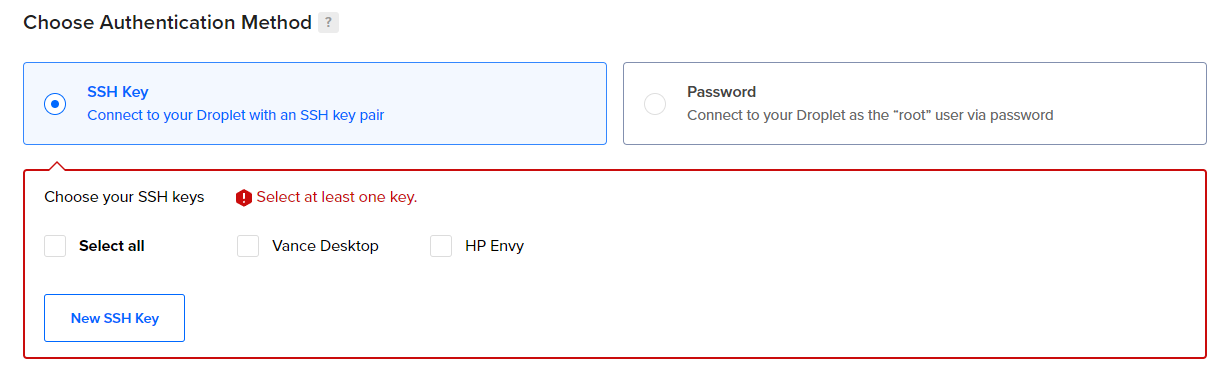
Authentication is basically how you'll connect to your Droplet. You'll notice I already have some SSH keys configured, but you likely won't. To add a SSH Key, just click the New SSH Key button and follow the steps. I'm not going to go into details on creating keys since there is plenty of documentation out there on how to do it. Once you have a key created, select it.
Finalize Details
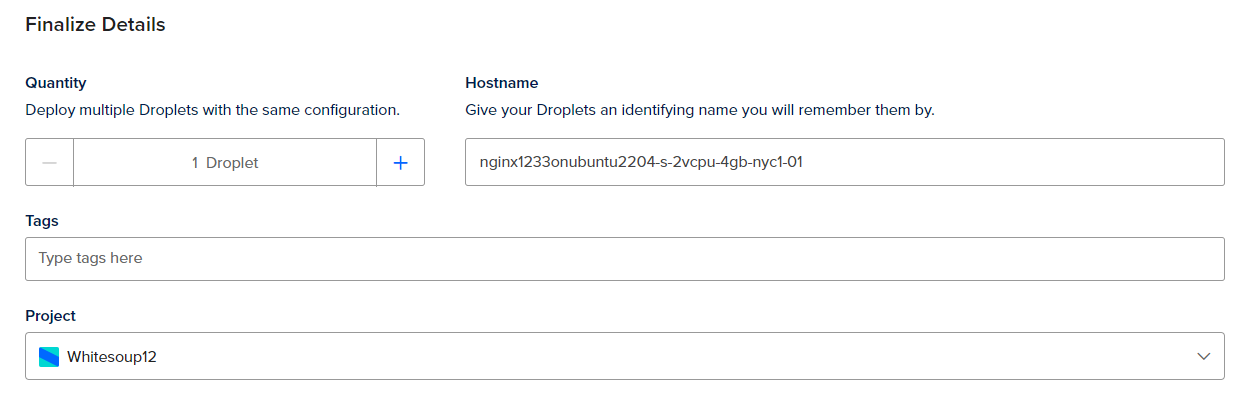
In the final step you can choose to change the name of your Droplet. Not required through. Once you're ready, click the Create Droplet button at the bottom of the page.
You'll be redirected to a page that will show the Droplet creation progress, which won't take very long.

Once the droplet is created, click on the Droplet name to view it.
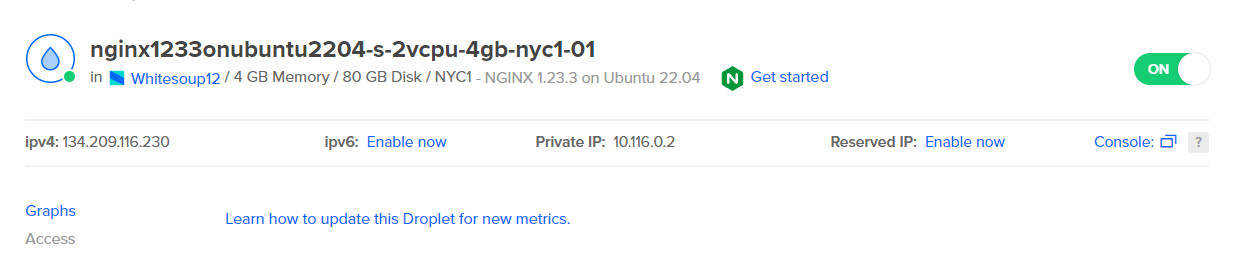
On the Droplet details screen, you'll want to take note of the ipv4 address. Also notice the Console link on the right. We'll be using that to interact with our new Droplet. But right now we're going to get our Cloudflare stuff set up.
Setup Cloudflare
Add a Site
When you log into your Cloudflare account, click the button that says Add a site.
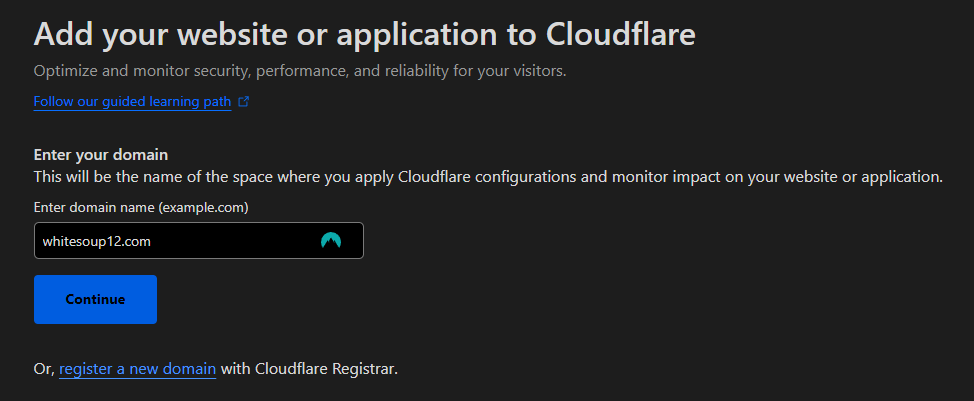
This is where you'll put in your domain (without the www). The one I'm using in this example is whitesoup12.com. Click Continue. You'll see some options for paid plans, but you don't need them. Just click the Free option at the bottom and then Continue.
Set Up DNS Records
The next screen you should see is the Review DNS Records screen. There may or may not be any records. It depends on if you've used this domain before. If there are nay existing records you'll probably want to remove them.
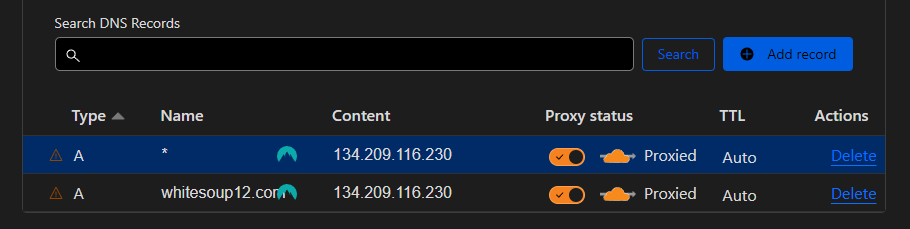
Now we're going to add two A records. These A records tell Cloudflare what IP addresses are associated with our domain.
The first one will be for our primary domain:
- Type: A
- Name: @
- IPv4: The IPv4 address of your new Droplet
The second one will be for any subdomain of our primary domain:
- Type: A
- Name: *
- IPv4: The IPv4 address of your new Droplet
After you add each of these records you will need to click save. When it's done it should look similar to this:
Click Continue
Set Up Nameservers
One the next screen, Cloudflare will provide you with 2 nameservers. These nameservers are given to your domain provider and tells them who's managing the records for the domain.
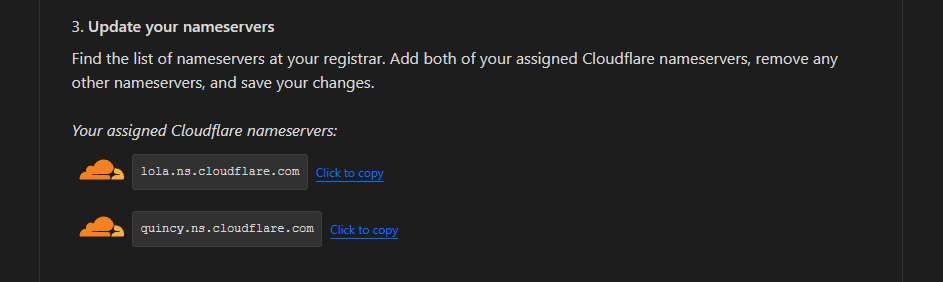
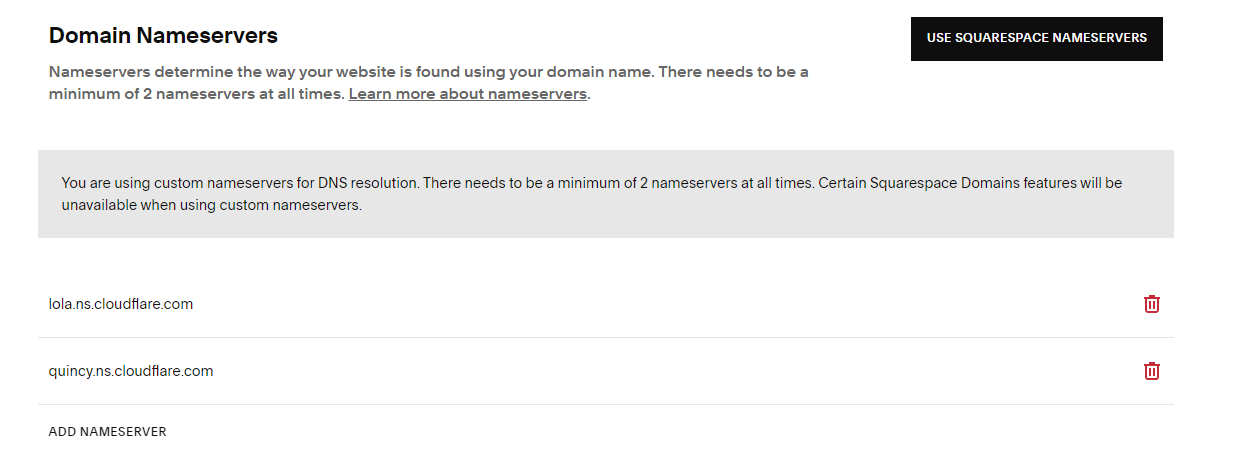
So for this next step you'll need to go to the provider you purchased your domain from. For my example that's Squarespace. You'll then need to track down the place where you can edit the Nameservers for your domain.
Copy the nameservers from Cloudflare and add them to your domain provider namespace records.
Back in Cloudflare, click Continue. There will be a Quick Start Guide screen. Click Finish later since we don't need to do this right now.
Now we just wait for our records to propagate. This can take anywhere from a couple of minutes to a couple of hours. You'll know it's working if you go to your site and you see this:
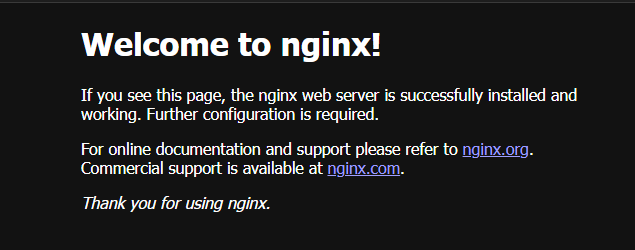
If you see this it means your domain is successfully hitting your new Droplet!
Then you probably won't see that screen. Don't fret, we'll soon get to the part where you set up NGINX on your own.
Droplet Configuration
The rest of our work is going to happen in the DigitalOcean Droplet Console. You can find a link to the Console on your Droplet page.
Download Remote Falcon Developer Files
These steps will pull the developer files from the Remote Falcon developer-files repo. These files are made to make the configuration process easier.
- Run
mkdir /root/developer-files. This is where the files will be stored. - Run
curl -s -L https://github.com/Remote-Falcon/developer-files/archive/refs/heads/main.tar.gz | tar xvz -C /root/developer-files. This command downloads the repo and extracts them into the directory we just created. - Run
cd /root/developer-files/developer-files-main/do-ubuntu-droplet. This will put us into the new directory with all the developer files. - Run
lsto verify the files are there.
Create SSL Certificates
To make sure our domain properly uses https we need to create some SSL certificates and put them on our Droplet. To do this, head back over to Cloudflare.
On the side menu, click SSL/TLS then Client Certificates. On the Client Certificates screen, click the Create Certificate button.
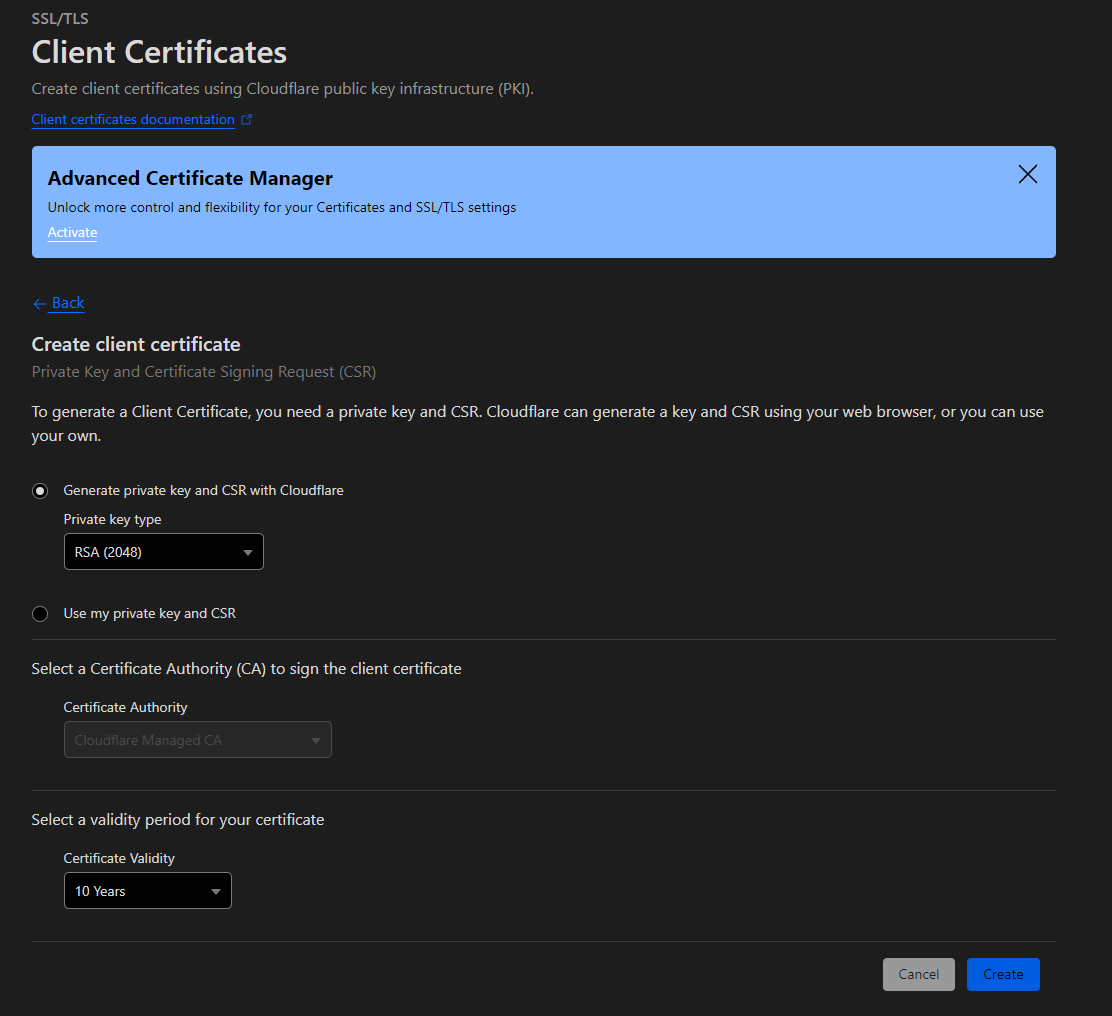
The default options here are just fine. Click the Create button.
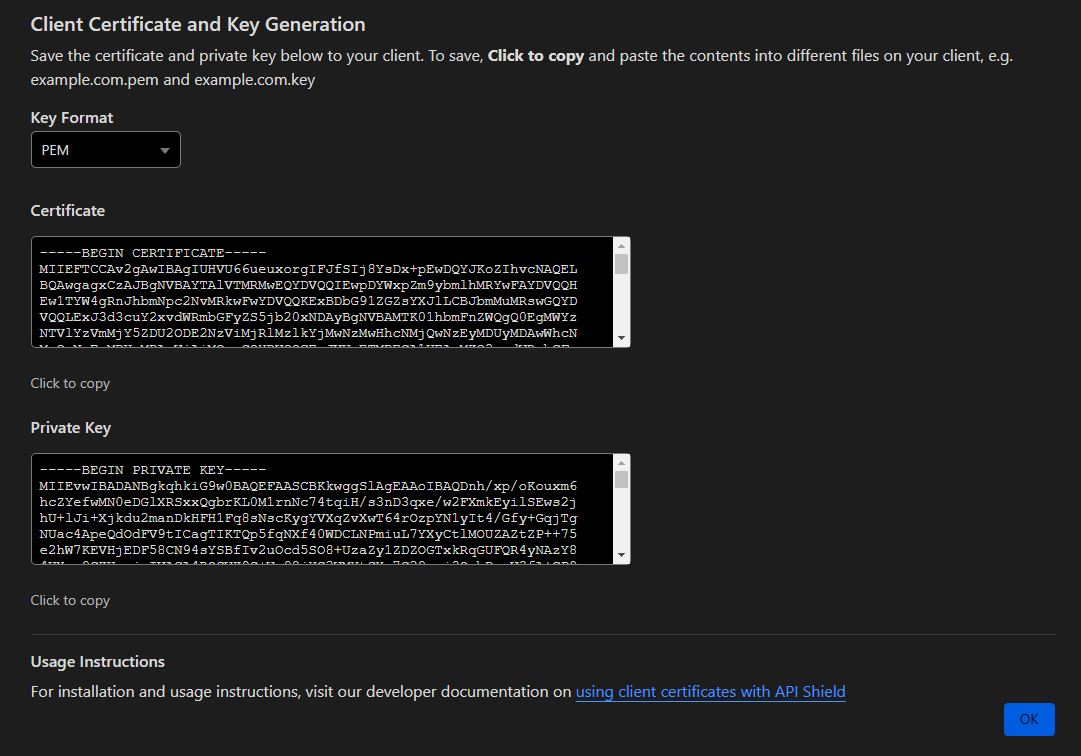
The next screen you'll get will display the Certificate and Private Key.
Add Certificates to Droplet
Back in your Droplet Console:
- Run
sudo nano /etc/ssl/cert.pem. This will open an editor in the terminal. - Go back to Cloudflare and copy the Certificate (just clicking in the box will copy the whole thing).
- Paste the Certificate in the Console.
- Press Control+X, Y (Save changes to buffer), then Enter (Save to file).
- Run
sudo nano /etc/ssl/key.pem. This will open an editor in the terminal. - Go back to Cloudflare and copy the Private Key.
- Paste the Private Key in the Console.
- Press Control+X, Y (Save changes to buffer), then Enter (Save to file).
- Back in Cloudflare, click the OK button.
Install Docker to Droplet
This is a part of the process that has been simplified with a script that was downloaded from the developer-files. To install docker on your droplet, run sh docker-install.sh (you may have to enter Y a couple of times during the process). You may also get a screen about restarting some services. Just tab to OK on both screens.
Once it completes, run docker -v to verify the command works.

Configure NGINX
Since we created our Droplet using an NGINX image we thankfully don't have to set it up. All we need to do is make a small update to the configuration file.
No worries, just means you have to install NGINX yourself. It's pretty simple though:
- Run
sudo apt update. - Run
sudo apt install nginx.
Run sudo nano default.conf
This will open up the pre-made configuration file for Remote Falcon. There are two lines with comments that will need to be changed.
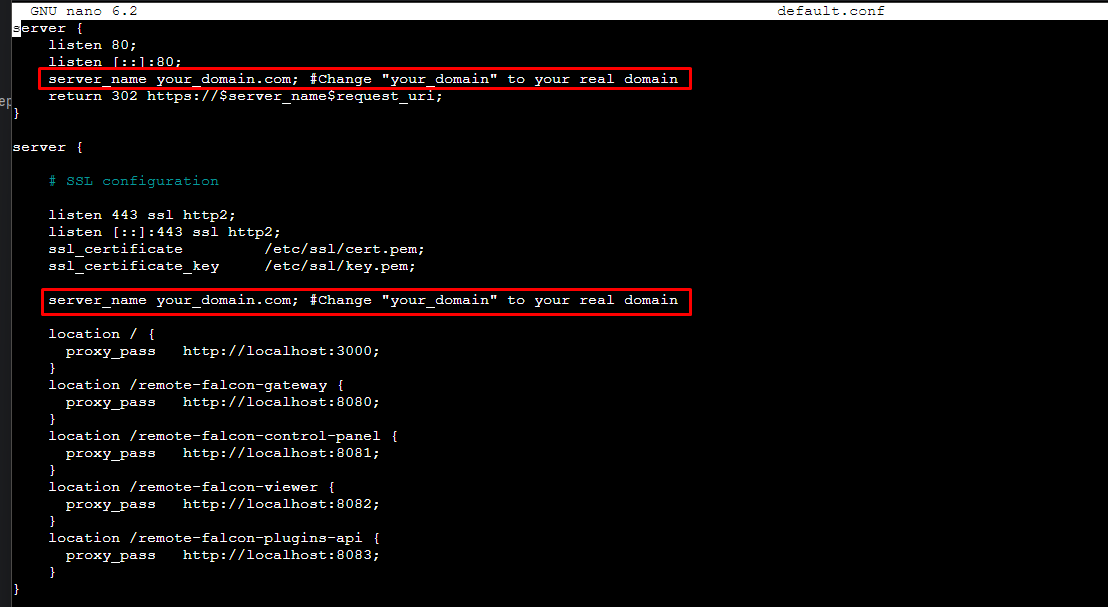
Replace your_domain with your actual domain name, like the example below:
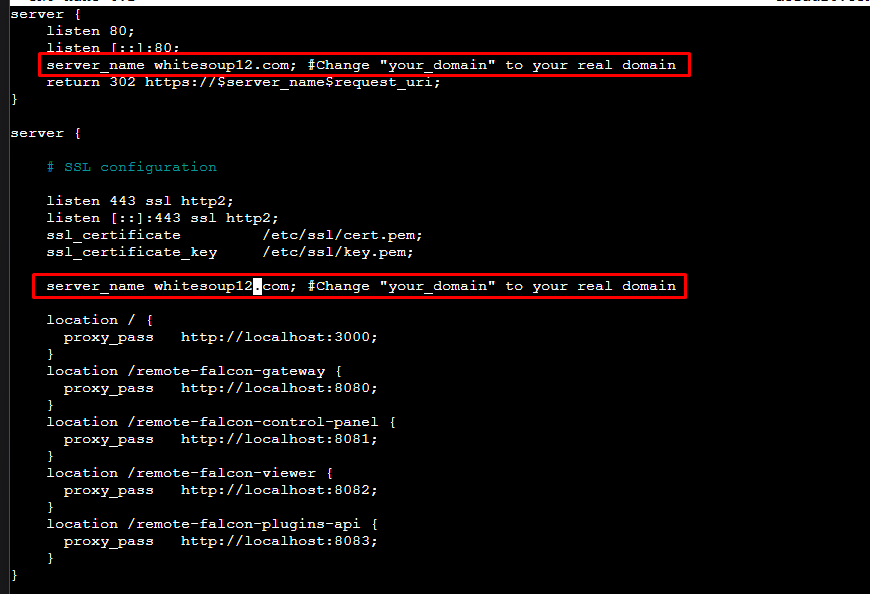
Once updated, Press Control+X, Y (Save changes to buffer), then Enter (Save to file).
Now we need to copy the new configuration, reload the firewall, and restart NGINX. All of this happens in the nginx-config.sh developer file, so all you have to do is run sh nginx-config.sh.
Update docker-compose.yaml
We're finally nearing the end! It's time to get Remote Falcon running on our Droplet. But first we need to make a few updates to the docker-compose.yaml file.
Run sudo nano docker-compose.yaml
There are a few things that need to be updated, each of which has a comment next to it. I've highlighted the properties below that need to be changed.
But first, let's talk about the SOCIAL_META property. If you plan to share your show to social media, you'll want to add some Open Graph tags to make your social posts look nice.
By default, the SOCIAL_META property is set to the main Remote Falcon site content, so you'll want to update it for your needs. You'll simply need to update the content portion of each tag with your info:
- og:url -> This would be the URL of your show page (i.e. showname.showdomain.com).
- og:title -> This would be your Show Name.
- og:description -> This would be a short description for your show.
- og:image -> This should be a URL path to an image, likely whatever image you use for your show.
You are free to add other tags as well, just make sure you use single quotes.
Use this Open Graph Checker to validate your tags are working.
services:
  control-panel:
    environment:
      - web.url=https://your_domain.com #Change "your_domain" to your real domain
      - jwt.user=123456 #Change this to a random value
  viewer:
    environment:
      - jwt.viewer=123456 #Change this to a random value
  ui:
    build:
      args:
        - CONTROL_PANEL_API=https://your_domain.com/remote-falcon-control-panel #Change "your_domain" to your real domain
        - VIEWER_API=https://your_domain.com/remote-falcon-viewer #Change "your_domain" to your real domain
        - VIEWER_JWT_KEY=123456 #This should match the jwt.viewer value in the viewer service
        - HOSTNAME_PARTS=2 #Change this to the number of parts in your hostname. For example, domain.com would be two parts ('domain' and 'com'), and sub.domain.com would be 3 parts ('sub', 'domain', and 'com')
        - SOCIAL_META=<meta property='og:url' content='https://remotefalcon.com/'/><meta property='og:title' content='Remote Falcon'/><meta property='og:description' content='Create a custom website where viewers can request or vote for sequences to watch on your light show.'/><meta property='og:image' content='https://remotefalcon.com/jukebox.png'/>
        - SWAP_CP=false #Change this if you want to swap your control panel and viewer page URLs. For example, if set to true, the Viewer Page will be the root URL and the control panel will be controlpanel.domain.com
        - VIEWER_PAGE_SUBDOMAIN=lumoslightshow #Set this to your show subdomain (show name in all lowercase with no spaces) if you have set SWAP_CP to true
Here's an example of the updated values:
services:
  control-panel:
    environment:
      - web.url=https://whitesoup12.com #Change "your_domain" to your real domain
      - jwt.user=abcdefg1234567 #Change this to a random value
  viewer:
    environment:
      - jwt.viewer=abcdefg1234567 #Change this to a random value
  ui:
    build:
      args:
        - CONTROL_PANEL_API=https://whitesoup12.com/remote-falcon-control-panel #Change "your_domain" to your real domain
        - VIEWER_API=https://whitesoup12.com/remote-falcon-viewer #Change "your_domain" to your real domain
        - VIEWER_JWT_KEY=abcdefg1234567 #This should match the jwt.vieweer value in the viewer service
        - HOSTNAME_PARTS=2 #Change this to the number of parts in your hostname. For example, domain.com would be two parts ('domain' and 'com'), and sub.domain.com would be 3 parts ('sub', 'domain', and 'com')
        - SOCIAL_META=<meta property='og:url' content='https://remotefalcon.com/'/><meta property='og:title' content='Remote Falcon'/><meta property='og:description' content='Create a custom website where viewers can request or vote for sequences to watch on your light show.'/><meta property='og:image' content='https://remotefalcon.com/jukebox.png'/>
        - SWAP_CP=true #Change this if you want to swap your control panel and viewer page URLs. For example, if set to true, the Viewer Page will be the root URL and the control panel will be controlpanel.domain.com
        - VIEWER_PAGE_SUBDOMAIN=lumoslightshow #Set this to your show subdomain (show name in all lowercase with no spaces) if you have set SWAP_CP to true
The URLs are pretty self-explanatory and are updated to point to your domain. The JWT values are used to sign the JWT tokens (used for authentication).
Once updated, Press Control+X, Y (Save changes to buffer), then Enter (Save to file).
Run Remote Falcon
Finally, run sh start-rf.sh. This will start all the Remote Falcon services on your Droplet. You might see some warnings about pull access, but they can be ignored. There will be a bunch of logs but once you start to see the logs slow down, go to your domain.
Remote Falcon should be up and running! Since this is a new instance you'll need to create an account. Email verification isn't needed, so you'll be able to log in as soon as your account is created.
Additional Configuration
For FPP users, you'll need to update the URL used by the plugin to point to your domain. Update the value to https://your_domain.com/remote-falcon-plugins-api.
